Category: Fencing Services

How to Repair Wooden Fence Posts and Rails

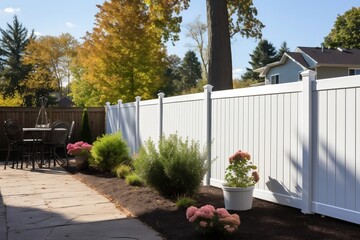
Wooden fences develop holes from slow weathering or impact damage, but these are easy to repair with wood filler and paint. Staining and sealing also prolong the life of your R.C Fence LLC.

fence repair

Ask your neighbors if you can access their side of the fence during the repair. This makes the job easier and faster.

A damaged fence post is a common problem that many homeowners face at some point. Usually, it’s due to severe weather conditions like heavy winds that can cause the soil to erode and lead to instability of the posts or wood rot caused by excessive moisture sitting against the post. It can also be due to poor materials used for construction of the fence or casual neglect such as failing to inspect the fence regularly for signs of damage and deterioration.

The best way to fix a damaged fence post is to replace it. However, before replacing it it’s important to evaluate the damage and determine if it makes more sense to repair the existing post instead of replacing it. This is especially true if the existing fence is quite old and showing signs of deterioration or damage.

Generally, if the damage is acute, like being struck by a vehicle or a bad storm, it may make more sense to repair it rather than replace it completely. On the other hand, if it’s chronic and likely to get worse unless addressed, such as wood rot, it may be better to replace it entirely.

Before starting the repair process, it’s a good idea to walk around the entire fence and examine the condition of each post. Be sure to look for cracks and chips in the boards as well as any areas where the fence wobbles or if there are signs of insect infestation like termite holes or trails.

It’s also worth noting if any posts are leaning. If left unattended, this could cause the rest of the fence to eventually fall down or break. It’s also important to check the ground around each post for looseness or if it has been shifted or buried in dirt that is too deep.

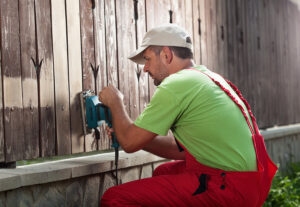
Once you’ve assessed the damage, it’s time to gather your tools and materials for the repair job. This should include a hammer, nails/screws, drill with proper bit sizes, saw, wood glue or epoxy, replacement boards/posts/pickets, level tool and wood stain/sealer/protector. It’s always a good idea to wear protective gear, including goggles and gloves.

Broken Rails

The rails that run from post to post across the top and bottom of your wooden fence are critical for its structure. They hold the fence boards and help to keep them in place, so if you notice any damage to these parts of your wooden fencing system, it is important to fix them right away.

While rot is the most common cause of broken rails, impacts can also break them. The best way to prevent this type of damage is by regularly applying wood preservative to the area, which can be purchased at most home improvement stores.

Another way to reduce the risk of broken rails is by increasing inspection frequency and using the most sophisticated testing methods available. This gives railroad companies a better chance of catching cracks before they become major safety hazards. However, this can increase the cost of running a train, so it is important to balance safety and efficiency when making these decisions.

As a result of these technological advances, the number of train derailments has dropped in recent decades. But broken rails remain the leading cause of derailments on mainline tracks, with a great potential for injury and even loss of life.

When a rail breaks, it can cause the wheels of a train to shift off track, causing the train to become unbalanced and possibly derailing. A train derailment can also have catastrophic consequences for the people on and around the trains, as well as the environment. For this reason, railroads are under constant pressure to improve the quality of their rail tracks and to reduce the number of broken rails they have to deal with.

Leaning Posts

Leaning fence posts can be difficult to fix, especially if the post is breaking at the base or has rotted. This can leave the entire stretch of fence in danger of collapse, and it’s important to get to the bottom of the problem and find a long-term solution.

Depending on the cause of the lean, your options may include strengthening the concrete footing, weatherproofing the fence, or changing to a different type of fencing. If the posts are simply unseated or weakened from external forces, however, you can usually straighten them with a few simple steps.

First, step back and examine the extent of the lean. Note its degree and direction, then use a spirit level to ensure the post is level. This will help you decide whether it’s an isolated issue or a symptom of a bigger problem.

If the post is merely unseated, dig around it with a shovel until you hit the concrete base holding it up. This will give you a better idea of how much support the post has and what needs to be done to it to keep it stable.

When digging, try not to remove too much of the concrete from the hole. You may need to re-use it later in the process. Once you’re confident the base of the post is solid, you can dig further to expose a broken or rotting section of the post. If the break is above ground, you’ll need to install a post mender.

Post menders (also known as spikes or anchors) are metal devices designed to be driven into the ground and fastened to a leaning fence post to stabilize it. They’re often used to repair wood fence posts, but they can also be installed on metal ones.

Screw one of these metal anchors to the top of a weak fence post and drive another into the ground below it, using a sledgehammer or other heavy tool. This will help to strengthen the connection between the broken post and its concrete anchor. If the damage to the post is serious, you’ll need to replace it entirely.

Falling Panels

If you find a panel that has fallen off your fence, it’s important to check the rest of the structure. If the rest of the panels are intact, the easiest fix is to re-glue the panel to its frame using Titebond III wood glue. If the frames are exposed, stain the area to match the surrounding wood tone. You can also paint larger areas with acrylics, thinned down with water. You can then blend colors to match the tone and make the repair nearly invisible.

The failure of the panel could have been caused by a number of issues. It appears that the slotted holes for fixings were too close to the edge of the panel, and the sheeting was quite thin. This may have caused material overload if the panel had been subjected to dynamic effects.

How to Properly Install a Vinyl Fence

Vinyl Fence

Vinyl Fence Installation offers security and style to your home or business. They are easy to install and require little maintenance.

Vinyl Fence

Before beginning your project, check deeds for easements and local zoning laws to make sure you can build your fence. This step will also help you determine how much your fence will cost.

Regardless of whether you’re installing a wood or vinyl fence, proper installation is critical. Fences that are not installed correctly can easily be damaged and ripped out by wind or even a simple rainstorm. One of the key steps to a successful install is digging the post holes. Using a post-hole digger or power auger is recommended to save time and effort. This can be rented from many equipment rental companies in your area for about a day’s worth of work.

First, you’ll want to accurately mark the location of your posts, including property lines and any other restrictions on the area. A string line is a great tool for this job, so be sure to use one and stretch it taut from the corners of your fence’s perimeter to each end. If you’re installing a gate, make sure the stakes touch this string line as well.

Once you have the locations marked, dig your posts’ holes with a post-hole digger or a power auger. Typically, the depth of your post holes should be 1/3 of the post lengths. Depending on the soil conditions, it’s also recommended to dig your posts at least 6 inches deeper than needed to help with gravel backfill.

Before you begin digging, it is very important to call your local utility digger’s hotline to have any underground lines marked. Hitting a line while digging can cause expensive damage to your property and even injury or death to you or someone else.

Set Posts

Although vinyl is more durable than wood, it can be damaged by miscalculated hammer swings. Likewise, poorly set posts can create stability problems and shorten the lifespan of the fence.

To avoid this problem, stake out the intended fence line using landscape stakes. After that, tie a string line between each post to determine the proper spacing. Use this string to set the end and corner posts first, then follow it to install the rest of the posts. This technique eliminates the guesswork that often goes into installing fence posts and ensures the vinyl panels fit correctly.

Once you dig the holes, pour in gravel or concrete to add support. For 7’ and 8’ tall vinyl fences, most manufacturers recommend reinforcing corner, end and gate posts with metal inserts or rebar instead of concrete. This adds strength to the fence and helps prevent the deterioration that can occur with traditional concrete.

While it may seem counterintuitive to take a shortcut on the post installation, this step is critical to the final appearance and stability of the vinyl fence. If you skip this step, you could wind up with a wobbly or even collapsed fence. For this reason, it’s best to ask a friend or family member to help you out with the work, especially when pouring and setting posts in concrete. It’s also a good idea to keep a level handy to check each post for straightness.

Pour Concrete

For those who prefer a concrete fence foundation, a vinyl fence can be set in concrete. This option is popular in areas of extreme weather, like Utah, where frost can push concrete posts out of the ground. To install vinyl in concrete, use a concrete mount kit, which includes a form, gravel base, and all the necessary hardware.

Before digging any holes, call the local “Call Before You Dig” line for your area. This will ensure that you do not hit any underground utility lines and cause damage or injury to yourself or others.

Once your holes are dug, add 6 inches of gravel to each post hole before adding the concrete. This will help drain water and allow the posts to stand up straighter in the concrete.

While you pour your concrete, use a form to make sure that the base of the post is sloped away from the post. This will help prevent water from pooling around the posts and rotting them out.

As the concrete sets, check the posts with your level or a string line to make sure that they are plumb. It is much easier to fix a post that is off plumb early in the process than it is to try and correct an entire fence later after the concrete has fully set. Make sure to keep a level handy at every step of the process!

Attach Post Brackets

Just like a wood fence, a vinyl one needs concrete to hold the posts in place. Once the post holes are dug, pour concrete into each of them to form a concrete base. Be sure to stop the concrete about 6 inches below the ground surface so that you can add soil and grass in the future. Use a trough or shovel to shape the concrete at the base of each post so that it slopes down away from the fence and water does not pool there.

Next, install your line posts – the posts that are in between the end posts – according to the style of your vinyl fence and your property lines. Using landscape stakes, mark where the bottom of each line post should go, and then string a level string line from each corner to each of these locations to ensure that all lines are plumb.

You can also add a top rail tie to each of these posts if you want to make it easier for yourself and others to attach the bottom rail to them in the future. Once the top rail is attached, put on post caps to prevent debris and moisture from collecting in them.

It’s important to check with local building regulations and zoning laws before you start to build your fence, so that you can avoid any mistakes that could cost you money or lead to a lawsuit. Some communities require that you use a licensed contractor to build your fence and may have stricter requirements about the materials and height of your fence than other areas. You should also make sure to look at your deed to see if any easements exist on your land, as these can limit where you can put your vinyl fence.

Attach Post Caps

Once you’re confident that your fence posts, bottom rails and vinyl fence panels are level and fitted together correctly, install the top rail and post caps. Follow the manufacturer’s instructions for this part of the job to ensure everything is secure and looks great.

Unlike wood, vinyl does not need staining or painting. It does, however, need periodic cleaning with water and mild detergent to keep it looking pristine. You’ll also need to repair damaged areas on the vinyl as soon as they are noticed. This will help to prevent the problem from spreading to undamaged sections of the vinyl and can extend the life of your fence.

There are a few other important things to consider before beginning your vinyl fence project. First, make sure that you call your local “Call Before You Dig” line to identify any underground lines before digging any holes. This will help to prevent any damage or injuries during your fence building project.

Finally, if you’re installing picket finials on your vinyl fence, be sure to purchase extras in case they get knocked off by lawn mowers, baseballs or anything else. Having spares on hand will allow you to quickly and easily replace them when they are lost. This is a fast, easy and inexpensive way to give your vinyl fence a more finished look. This is especially true if you choose a color that contrasts with the surrounding landscape or house.

Install Panels

After you’ve set the posts, it’s time to install the fence panels. This is a fairly easy task that will likely remind you of those snap-together model kits from your childhood. However, you should follow the manufacturer’s instructions carefully.

Before you begin installing the panels, make sure that your yard has been cleared for your fence’s length and that it has been surveyed to ensure that you can comply with local building regulations. Also, check your deed to see if your property contains any easements. These are areas that another party (such as a utility company) has rights to, and they can impact where you’re able to put your fence.

If you’re planning on adding a gate to your vinyl fence, make sure that you have all of the necessary hardware. Typically, this includes hinges and latches. You might need to have these installed before you actually begin working on the gates or else they will not fit properly.

You should also have extra picket finials on hand, as these are glued to the top of the pickets and can be knocked off by baseballs, footballs, tennis balls, dogs, or even tree limbs. While they are relatively inexpensive to replace, it’s best to keep them handy just in case. Also, you should have a lock on your gate to prevent unauthorized access and robbery. These can be bought from most home improvement stores and are very easy to install.

Fencing Services – Things to Consider Before Hiring a Fencing Contractor

There are several factors to consider when hiring Fencing. Some of these include the type of fence you want, the cost, and the contractor’s experience. Additionally, you may want to know whether they have the proper liability insurance. Before hiring a fence contractor, you should read customer reviews and check the Better Business Bureau website. Additionally, a professional fence contractor will let you review their contract before you agree to it.

Fencing Services

The cost of a fence installation can vary widely, depending on the size of the project, the fence material, and the labor involved. Professional fence installers can charge anywhere from $5 to $20 per linear foot. Do-it-yourself homeowners can save up to 50% by doing the work themselves. However, fence installation is a complex process, and if you’re unsure of your ability to do it correctly, call a local fence contractor.

The cost of a fence installation can also vary widely depending on where you live. If your property is located in an easily accessible neighborhood, the cost of a fence installation will be lower than in a remote or hilly area. In addition, fence installation can be more costly if there are obstacles in the yard.

The cost of a fence installation varies greatly depending on the materials used and the style chosen. Aluminum fences are less expensive than wood and can range from $20 to $50 per linear foot. Wooden fences are also more expensive, but they are more durable. Composite fences are more affordable than wrought-iron fences, which can cost hundreds of dollars.

Fencing for large properties can be quite costly. Unless you’re planning on having livestock, you shouldn’t install barbed wire or ornamental wrought iron fencing on your property. Even if you don’t have livestock, certain types of fencing are better suited to a large area of land.

If you’re planning to sell your house, investing in a new fence can increase the value of your property. Since buyers want to see how well a home looks, a new fence installation can give you a competitive edge over your competitors.

Whether you’re looking for privacy or deterrence, there are a number of different types of fences available. Fences are used to separate properties, prevent trespassers, and ensure that your pets stay inside. They also help protect your landscaping and add architectural value to your property.

Some fences are made of wood, but others are composite. Composite fences are very affordable and can mimic the appearance of wood pickets. However, these fences are not as sturdy as wood fences. Nevertheless, they are great for privacy and are resistant to extreme weather conditions.

A wood fence can last a long time with moderate maintenance. A yearly application of a penetrating sealant will help to preserve the wood’s color and prevent it from fading. This treatment should be done as soon as the fence is installed and every year thereafter.

Wooden fences require more maintenance than synthetic materials. However, depending on the type of wood, they can last for decades. They also provide privacy and good looks. Using large horizontal planks can give the fence a unique look. In addition, wrought iron fences give your home a classic, classy look. These fences are sturdy but can be see-through, making them a great option for curb appeal.

Another type of fence that can be used for privacy is a cap and trim fence. These fences are commonly seen on larger properties and farms. They are generally white, but you can also opt for a different color. Cap and trim fences are durable and look great, but they may be more expensive than other types of fences.

Before hiring a fence contractor, it’s a good idea to ask about their experience. A good contractor should have a portfolio on hand and be willing to provide references. A good fence contractor can point to at least three satisfied clients. Also, be sure to get an estimate from the contractor in writing, which will include a site plan and numbers. There shouldn’t be any hidden fees or charges, and you should be able to ask the contractor about small details and any deviations from the original plan.

Experience matters – A fence contractor with a solid track record of satisfied customers will likely be able to answer any questions you might have. If the contractor is experienced in your local area, he or she will be able to guide you toward the best choice. You should also check the contractor’s certifications and previous work history. This is a strong indicator of the quality of the company.