Tag: leak detection

A Guide to Bathtub Installation

Bathtub installation can feel like a major project, especially when remodeling a full bathroom. Follow this guide to make the job easier and avoid costly mistakes. If your old tub surround is glued to drywall, pull it off with a pry bar and hammer. Add new 2×4 nailers to the studs to support a ledger board where necessary. Visit Website to learn more.

plumbing

If you’re installing a new tub, it’s important to do things correctly. The tub needs to be properly supported so it doesn’t flex when you stand on it, and the plumbing must be connected to it correctly so water doesn’t leak or back up through the wall. If you’re uncomfortable with doing this kind of work, it’s best to hire a professional plumber.

Before you start working on your bathtub installation, make sure the water is turned off and that the old drain plumbing is disconnected. Also, turn off your home’s main water supply line in case there are any problems with the pipes during the process.

Next, lay down a piece of cardboard or plywood over the floor where you’re working to protect it from damage. You’ll need to remove any nails or screws that are anchoring the tub flange to the studs in order to remove and install the new one. It’s also a good idea to cover the surrounding walls with a plastic sheet to prevent any splashes of mortar.

Use a pry bar or screwdriver to loosen and remove any screws or nails holding the flange of the tub in place. After the flange is removed, use a pair of pliers to loosen the drain stopper and linkage. Then, disconnect the trip lever and rocker assembly by turning them counterclockwise to open it. You may need a wrench to do this, depending on the type of drain you have.

Once all the parts are removed, carefully slide the new tub into the alcove. Ensure the bottom lip of the tub is resting on your bed of mortar, and use a level to check that it is straight. If it’s not, you can correct the problem by mixing more mortar and re-laying the lip.

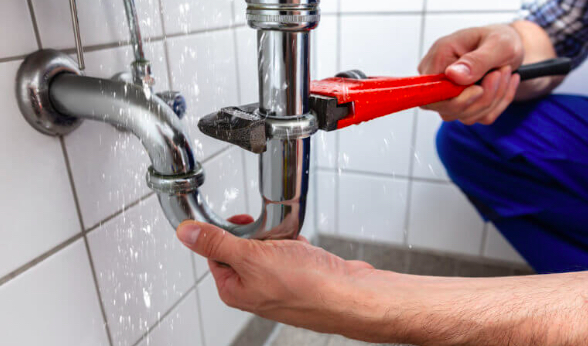
Now, if the manufacturer has given you specific instructions about where to set your tub, use your level to determine that the flange is in the center of the studs. If not, you can adjust the studs by drilling or tapping them in place to make sure they are straight. Now, you can connect the waste and overflow pipe to the drain outlet using plumber’s putty and Teflon tape, which you can tighten with a wrench.

Ledger Board

The ledger board is a critical part of the bathtub installation process because it reduces the amount of weight and stress that is put on the deck framing and tub flange. It also prevents moisture from leaking into the house. If you are installing a new deck, the ledger board should be installed before you dig your footings and set posts. It should also be used as the basic point of reference for determining all the joist framing.

Look at your house and determine if it is sided with traditional lumber frame under clapboard or beveled wood siding. If it is, a small section of the siding will need to be removed so you can attach the ledger board. Once the ledger is in place, it is secured to the house wall using joist hanger brackets and treated deck screws. The joist hanger brackets are pre-bent to fit the inside corner of the ledger and building wall. They are also affixed to the ledger with special 1-1/2″ long double hot-dipped zinc coated joist hanger nails.

Find the height that you want your tub to sit at and mark it on the ledger board. Then mark a line 5.5″ above that on the siding under the ledger. Fold a piece of ledger tape into that spot, remove the release liner and press to adhere.

Screw the ledger board into the joists, being careful not to screw into the flange of the bathtub. Screws should be spaced about 4′ apart or so. Some builders used to use nails for this job, but lag screws are more durable and will hold stronger because of their metal construction.

When you’re done, use Kerdi-Fix to seal the holes that were created. This is important because you want the walls to be as flat as possible for a strong and professional finish.

Check the manufacturer’s specifications for your tub to see if there are specific distances you need to account for on the ledge where the stringer board is mounted. Find the studs in the wall where you marked the ledger and mount a 2×4 to that location. This will be the stringer board that supports the tub. Screw this into the joists with structural lag screws (also called “heavy duty” screws).

Faucets

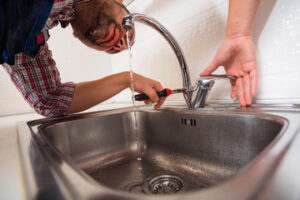
Before you can set the bathtub in its alcove, you’ll need to install the faucets. You can’t do this until you’ve disconnected the water supply lines (Photo 1). Locate the shutoff valves, usually in an accessible panel in another room or the basement. Turn them off to cut off the water, then take apart your existing shower head, tub spout and handle (Photo 2). Put the parts in a bag or box for safekeeping.

Use a screwdriver to unscrew the faucet hardware from the back of the wall. Identify the type of drain assembly, and get a replacement that matches it. If you’re replacing an old bathtub, you can reuse the spout and drain cover but you’ll need to find or purchase new tub filler and drain shoe.

Once you’ve removed the old faucet assembly, make a mark on each wall stud across the top of the tub flange. This will indicate where to locate the new stringer board. Cut a two-by-four to match the length of the new flange and line it up with the marks on the studs. Screw the board to the studs with exterior grade screws.

Before you place the new tub in its alcove, look down the front of the tub to see if there’s a 1″ gap between the bottom of the tub and your floor below. This will ensure that the tub sits on a solid surface and that the overflow tube and drain shoe fit well.

If you’re using a standard chrome-plated or nickel-plated finish, paint the overflow tube and shoe with enamel paint to match your tub. Otherwise, you can buy matching paint from the tub manufacturer.

If you’re installing a ceramic-disk cartridge faucet, you don’t need to paint it. These high-tech faucets are extremely durable and easy to repair. However, they’re expensive compared to other types of tub faucets, and you might have trouble finding an experienced plumber to repair one if it breaks down. For this reason, many builders recommend that homeowners stick with name-brand products from wholesalers they can trust to stand behind their products.

Drains

A tub needs a drain and, in most cases, a waste-and-overflow (WO) pipe. Using the tub manufacturer’s directions, drill holes for these accessories. Some bathtubs include an insulated support structure on the bottom; in this case, you don’t need to install additional pipes. Otherwise, mix a batch of mortar and spread a thick layer where the main tub drain will be. Be sure to leave several inches clear of the primary drain location. Some manufacturers advise that you drill through the acrylic tub flange and drive screws to the studs, while others recommend hammering nails into the ledger board (which is also called a “stringer”).

If your new tub has an overflow tube and shoe, install these as well. It’s a good idea to lay out a diagram before you start work, since every bathtub is a little different and each has its own specific installation requirements.

Test the water flow and connections by filling the tub and turning on the hot and cold faucets. If everything is fine, you’re ready to move on to the next step.

Before installing the tub, note how the apron — or outer edge — meets the finish floor. If there’s a gap, you can fill it with a silicone sealant.

It’s a good idea to build in an access panel that’s large enough for you or someone working for you to reach the old drain and tub fittings. You’ll need access later to repair or replace these, and you don’t want to be left without a way to get to them in the middle of a project.

Once the ledger board is crewed, it’s a good time to add the drywall to the ceiling around the tub. If you’re not going to tile the walls, it’s especially important that you put a moisture barrier on the drywall and use water-resistant caulking to seal all joints. In some cases, you’ll need to add a sheet of plywood or cement backerboard as an additional water barrier beneath the bathtub.

How to Repair a Leaking Faucet

Leaking faucets are a nuisance that no homeowner wants. Fortunately, there are steps you can take to repair a leaky faucet. First, shut off the water at the main supply. This will help you avoid a costly call to a plumber. Next, remove the faucet handle and its screw.

Leaking Faucet

If you have a dripping sink, shower, or tub faucet, there are several things that you can do to fix the problem. These include cleaning the parts that are causing the leak, changing out the washer or O-ring, and replacing the valve seat. However, if you want some professional help, you can contact a professional plumber.

A dripping faucet can be very annoying, especially since it wastes water and increases your utility bills. It can also leave rust stains on your countertops and cabinets.

One of the best ways to fix a leaking faucet is to replace the washer or O-ring. You can usually find these parts at your local hardware store.

Before starting a repair, you should turn off the water supply to the faucet, either at a shutoff valve under the fixture or at the main shutoff valve located in your basement or crawlspace. This will ensure that there is no pressure buildup in the pipes before you start working on it.

Next, take the faucet stem assembly apart. This is the part that is screwed into the valve seat and the handle body. On older faucets, this may be concealed under a decorative cap on the handle. To remove it, grip the cap with pliers and unscrew it.

Then, remove the handle body from the faucet stem assembly and inspect it for signs of damage or wear. If the handle is bent or swollen, you might need to replace the washer or O-ring.

If the handle is in good condition, it will likely not need to be replaced. If the handle is loose, however, it could be a sign that there is a leak in the handle itself. You might want to get a plumber to check it out.

Now, remove the old stem washer and screw, then install a new one in its place (smooth side out, any embossed writing on it affixed to the stem base). If the washer is secured with a screw, insert it into the hole and tighten it with a screwdriver.

The round ridge in the bottom of this washer is the seat against which it presses to close the valve. If the ridge is cracked or slightly rough, this will allow water to leak out when the washer is compressed. A damaged valve seat should be replaced or refaced, but this isn’t something you should do unless you are a plumbing expert and have some tools to do it yourself.

Ball faucets are a common type of single-handle bathroom and kitchen faucet. They have a ball-shaped cap and a rubber washer that sits on the end of the spout, preventing water from leaking through the spout. If the rubber washer wears out, the faucet can leak, and you may need to replace it.

Leaks are often caused by worn-out seals and O-rings, but they can also be a result of corrosion or wear in the valve seat. If your ball-type faucet is leaking, take it apart and inspect the parts for wear or damage.

The first step is to remove the decorative caps on each handle. These will usually have an “H” or a “C” on them. Once the caps are off, look for an Allen screw hidden underneath. Use a flathead screwdriver to loosen the screw, and then remove it.

If the Allen screw is too tight, turn it counter-clockwise to loosen it enough for you to access it. If it is too loose, you can try to unscrew it with a spanner tool found in most repair kits.

You can also use a flathead screwdriver to remove the ball. You can then clean the ball and seat with a soft cloth. Alternatively, you can buy replacement seats and springs from a plumbing supply store or a hardware store.

Once you have the new parts, it’s time to reassemble the faucet. This process can be a little difficult on a ball faucet because there are many parts that need to fit properly. You can make things easier by taking photos or notes of each part as you go along.

Once the parts are in place, you’ll need to tighten the retaining nuts. These nuts can be located on the body of the faucet or in the handle itself. Depending on the design of the faucet, they may have exterior threads that tighten onto the main body or interior threads that lock into the handle. The retaining nuts can be tightened with a box end wrench or crescent wrench.

Ceramic disc faucets are one of the latest technologies in modern faucet design. They combine hot and cold water in a mixing chamber with two ceramic discs that raise and lower to control the volume of water flow. The low-friction design allows the handle to turn on and off easily, making them more user-friendly for people with disabilities or other conditions that restrict grip.

They are also very durable, making them a good investment for homeowners who want to avoid the frequent need for repairs. They tend to cost more than traditional faucets, but the premium price is typically well worth it over the long run.

If you have a leaking ceramic disc faucet, it is essential to shut off the water supply and inspect the faucet body. You may need to replace seals or a damaged cartridge if the leak is coming from these areas.

First, remove the escutcheon cap and the decorative screw. Then, unscrew the cylinder mounting screws and lift off the cylinder. You can clean the cylinder with distilled white vinegar and a soft scouring pad, or you can replace it with new neoprene seals.

Once you have a clean and dry cylinder, you can reinstall it to your faucet. Depending on the type of ceramic disc faucet you have, the order of parts to reassemble should be neoprene seals, ceramic-disk cylinder, cylinder mounting screws, escutcheon cap, handle, and decorative screws.

It is a good idea to use a hose to test the faucet after you have repaired it, as this will help eliminate air that could potentially leak into the system. You should also check the cylinder openings for any debris that might have accumulated during the repair process.

If you are unable to fix the leaking ceramic disc faucet, you might need to replace the cartridge. Luckily, this is a fairly simple task, as many faucet manufacturers produce cartridge replacements in standard sizes. You can buy them at any hardware or plumbing supply store, and they usually come with a plastic spanner cap that helps to twist and loosen the cartridge to make it easier to remove.

Single-handle faucets are usually easier to repair than other types of faucets because there is only one part that needs to be replaced. However, if a dripping or leaky faucet is causing damage to your sink or countertops, you may want to call a plumber instead of doing the work yourself.

To begin the repair process, you need to determine what is causing your faucet to drip. Sometimes it is the cartridge or the O-ring, which are simple parts that can be purchased from hardware stores. Other times, you will need to replace the entire faucet.

Once you have a clear understanding of what is wrong with your faucet, you need to get the correct tools and parts to fix it. These include a crescent wrench, needle-nose pliers, and replacement parts for your particular faucet model.

First, take the handle off of your faucet by removing the decorative cover and loosening the setscrew with an Allen wrench. It is often located under the cover on the back of the handle or beneath a small cap on the front that you can pry off with a small flathead screwdriver.

Now that you have the handle off, you can get to the retaining nut for your cartridge. Depending on the type of cartridge, you might need to remove a decorative collar or other parts before reaching it. If the nut is a large hex-shaped nut, use channel-type pliers or an adjustable wrench to turn it counter-clockwise and remove it.

Next, pull the cartridge out of the faucet body. You can do this by simply pulling it straight up or by placing it on a rag and turning the nut clockwise until you have enough room to pull it out.

Then, insert the new cartridge into your faucet body, aligning the tabs or pegs on the cartridge with the notches or holes in the faucet body. You will also need to replace the retainer nut or clip it onto the cartridge, as needed.