Author: Mary Lynch

How to Prepare for Insulation Removal

Old and damaged insulation can cause mold, rot, or structural damage to your home. It also holds moisture, which creates a breeding ground for mildew and other contaminants.

Insulation can only last so long before it needs to be replaced. Here are some tips on removing the old insulation: Read https://perthinsulationremover.com.au/ to learn more.

insulation removal

Insulation removal is a messy job that produces a lot of dust and combustible material. To keep your home safe and your family healthy, prepare for this project before it begins. First, ensure you have a high-powered shop vacuum and the equipment necessary for removing insulation. Covering up your walls and floor to protect them from the mess would be best. Next, prepare your tools and make a path to the attic access. Make sure that this path is free of furniture pieces, planters, and any other obstacles that can get in the way.

The attic is an important part of a house and should always be inspected for damaged or old insulation. Comfort 1st technicians recommend thoroughly inspecting the attic space before any insulation installation or removal. This will help you identify the issues and get them fixed as quickly as possible.

There are several reasons why a homeowner might need to remove their existing insulation. This may include severe storm damage, an animal infestation, or even deterioration and mold. It is important to address these problems as soon as possible to prevent structural damage and ensure that the home has proper airtightness.

A professional insulation contractor can evaluate the situation and determine the best course of action for the situation. If the attic space is infested with raccoons, for example, it will need to be cleaned and disinfected before new insulation can be added. This will eliminate the raccoon droppings and urine, which can lead to bacteria, disease, and musty odors in the living spaces of a home.

You should also close any doors or openings that connect the attic to the rest of the home. This will keep the dust and combustible material from blowing into other areas of the house during the insulation removal process. If you have pets or children, ask them to stay away from the area during this time for their safety as well as that of your insulation installers. In addition, make sure that you have enough toys and snacks to keep them occupied while the work is being done.

Insulation is an important part of any home or business. It keeps you warm in the winter, cool in the summer and helps to reduce energy bills. However, over time, it can lose its effectiveness and need to be replaced. When this happens, it’s a good idea to hire an insulation professional to do the job properly and safely.

Having old, outdated or damaged insulation in your attic can make your home less comfortable and increase energy bills. In addition, it can also promote the growth of mold and other harmful bacteria. As a result, it’s crucial to have it removed and replaced with new insulation as soon as possible.

Attic insulation professionals will usually install the new insulation of your choice immediately after removing the old one. This helps to ensure that your home is continuously insulated and that you continue to save on energy bills.

If you choose to do the work yourself, it’s important that you follow all safety protocols and follow proper steps for DIY insulation removal. The first step is to wear the right equipment, such as masks and overalls. Then, begin by preparing the area where you will be working. Cover up any furniture or other items that you don’t want to get covered with insulation dust. Next, clear a pathway from your attic access to your attic door. Finally, set up a ladder and secure it in place.

Before you start to remove the insulation, it’s essential that you have a vacuum with attachments designed for use on insulation. Avoid using a regular household vacuum for this project. These vacuums are usually not strong enough to suck up debris such as woodchips, insulation and chunks of drywall. It’s also important to be careful when walking around your attic space. It’s easy to fall through attic joists, especially if you are not familiar with the area.

It’s also a good idea to have a large trash bag on hand to put the old insulation in. If you are unsure of how to dispose of the insulation, you can check with your local recycling or waste management facility. They will be able to tell you what types of materials can be recycled and how to properly dispose of them.

Insulation removal can be a messy job. Old insulation is prone to falling apart, leaving behind a mess in your attic space and the rest of your home. It’s important to cover furniture and other objects in living areas to protect them from getting dirty. It’s also important to wear protective gloves and a mask to prevent inhaling any of the debris that gets stirred up during insulation removal. The best way to avoid a big mess is to hire professionals to remove your insulation. They have the tools, protection, and equipment to do the job safely and efficiently.

A professional insulation removal service will inspect the attic space to ensure that the right type and condition of insulation is removed. They can then install a new insulation solution in your attic and living spaces. This will help to improve the energy efficiency of your home, which will save you money on heating and cooling costs.

In addition to reducing energy costs, replacing outdated insulation is often necessary for safety reasons. Compromised insulation can pose health risks in the form of mold and fungal growth. This can be a serious problem since attics, crawl spaces, and rim joists are the perfect locations for mold to grow. Mold spores can lead to respiratory problems and other health issues.

Another major benefit of replacing old insulation is that it can reduce the risk of fire. Deteriorated and improperly installed insulation can provide a direct path for flames to reach electrical wires. This can cause dangerous and deadly fire accidents. Installing new insulation can reduce this risk and help to keep your family safe.

Lastly, removing old insulation can help to prevent a rodent infestation. Rodents such as rats and mice are attracted to attic spaces, where they can chew through wires and leave excrement and urine in the insulation. This contaminated insulation can make its way into the rest of your home, causing health problems such as rashes, asthma and allergies. It’s important to remove this contaminated insulation before it causes any damage.

Before starting, be sure to move any items that are not needed in the attic space and cover the floors and walls with plastic to protect them from debris. Also, be sure to clear a path from the attic door to the outside. Once you’re ready to begin, put on your protective gear and start the process. Take breaks every 15 minutes or when your body temperature starts to rise.

Insulation is a great way to keep your house comfortable, but it’s also a big part of the waste that can end up in landfills. As a result, it’s important to dispose of the insulation debris properly when you’re removing it from your home. The best option is to find a waste removal company that offers construction debris disposal services and rents a dumpster or container to help you get rid of it. You can then fill the dumpster with all of your construction waste, including the insulation, and have it hauled away when you’re finished.

Most types of insulation are not safe to throw away with regular trash, so it’s important to research the best way to dispose of them. For example, you may want to find out if your local waste disposal authority accepts fiberglass insulation for recycling. This can help you avoid paying fines for improper trash disposal. Additionally, you can find out if your area has special recycling facilities that specialize in converting old insulation into new insulation materials.

The main reason you’ll need to dispose of insulation is when it becomes damaged or outdated. This can be due to a change in the building’s structure, a desire to switch to a different type of insulation, or simply because the material has reached its natural lifespan and must be replaced.

If the damage or deterioration is serious, it’s important to call in a professional who can assess the situation and determine the best solution. This could involve removing the damaged materials and replacing them with new ones, or it could be as simple as sealing off any entry points used by the dead animal and spraying the area for mold.

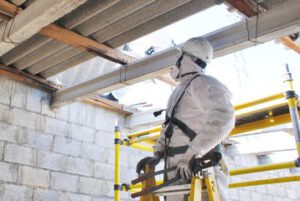
During the removal process, it’s important to protect yourself from asbestos fibers by wearing protective clothing and taking precautions when handling the old insulation. This includes long sleeves, pants, thick work gloves, a face covering, and safety goggles. It’s also a good idea to block off areas of the home where you’re working so that pets or children don’t accidentally inhale the dust. In addition, you’ll need to contain the insulation by putting it in contractor bags to prevent it from spilling out during transport.

How to Repair Wooden Fence Posts and Rails

Wooden fences develop holes from slow weathering or impact damage, but these are easy to repair with wood filler and paint. Staining and sealing also prolong the life of your R.C Fence LLC.

fence repair

Ask your neighbors if you can access their side of the fence during the repair. This makes the job easier and faster.

A damaged fence post is a common problem that many homeowners face at some point. Usually, it’s due to severe weather conditions like heavy winds that can cause the soil to erode and lead to instability of the posts or wood rot caused by excessive moisture sitting against the post. It can also be due to poor materials used for construction of the fence or casual neglect such as failing to inspect the fence regularly for signs of damage and deterioration.

The best way to fix a damaged fence post is to replace it. However, before replacing it it’s important to evaluate the damage and determine if it makes more sense to repair the existing post instead of replacing it. This is especially true if the existing fence is quite old and showing signs of deterioration or damage.

Generally, if the damage is acute, like being struck by a vehicle or a bad storm, it may make more sense to repair it rather than replace it completely. On the other hand, if it’s chronic and likely to get worse unless addressed, such as wood rot, it may be better to replace it entirely.

Before starting the repair process, it’s a good idea to walk around the entire fence and examine the condition of each post. Be sure to look for cracks and chips in the boards as well as any areas where the fence wobbles or if there are signs of insect infestation like termite holes or trails.

It’s also worth noting if any posts are leaning. If left unattended, this could cause the rest of the fence to eventually fall down or break. It’s also important to check the ground around each post for looseness or if it has been shifted or buried in dirt that is too deep.

Once you’ve assessed the damage, it’s time to gather your tools and materials for the repair job. This should include a hammer, nails/screws, drill with proper bit sizes, saw, wood glue or epoxy, replacement boards/posts/pickets, level tool and wood stain/sealer/protector. It’s always a good idea to wear protective gear, including goggles and gloves.

Broken Rails

The rails that run from post to post across the top and bottom of your wooden fence are critical for its structure. They hold the fence boards and help to keep them in place, so if you notice any damage to these parts of your wooden fencing system, it is important to fix them right away.

While rot is the most common cause of broken rails, impacts can also break them. The best way to prevent this type of damage is by regularly applying wood preservative to the area, which can be purchased at most home improvement stores.

Another way to reduce the risk of broken rails is by increasing inspection frequency and using the most sophisticated testing methods available. This gives railroad companies a better chance of catching cracks before they become major safety hazards. However, this can increase the cost of running a train, so it is important to balance safety and efficiency when making these decisions.

As a result of these technological advances, the number of train derailments has dropped in recent decades. But broken rails remain the leading cause of derailments on mainline tracks, with a great potential for injury and even loss of life.

When a rail breaks, it can cause the wheels of a train to shift off track, causing the train to become unbalanced and possibly derailing. A train derailment can also have catastrophic consequences for the people on and around the trains, as well as the environment. For this reason, railroads are under constant pressure to improve the quality of their rail tracks and to reduce the number of broken rails they have to deal with.

Leaning Posts

Leaning fence posts can be difficult to fix, especially if the post is breaking at the base or has rotted. This can leave the entire stretch of fence in danger of collapse, and it’s important to get to the bottom of the problem and find a long-term solution.

Depending on the cause of the lean, your options may include strengthening the concrete footing, weatherproofing the fence, or changing to a different type of fencing. If the posts are simply unseated or weakened from external forces, however, you can usually straighten them with a few simple steps.

First, step back and examine the extent of the lean. Note its degree and direction, then use a spirit level to ensure the post is level. This will help you decide whether it’s an isolated issue or a symptom of a bigger problem.

If the post is merely unseated, dig around it with a shovel until you hit the concrete base holding it up. This will give you a better idea of how much support the post has and what needs to be done to it to keep it stable.

When digging, try not to remove too much of the concrete from the hole. You may need to re-use it later in the process. Once you’re confident the base of the post is solid, you can dig further to expose a broken or rotting section of the post. If the break is above ground, you’ll need to install a post mender.

Post menders (also known as spikes or anchors) are metal devices designed to be driven into the ground and fastened to a leaning fence post to stabilize it. They’re often used to repair wood fence posts, but they can also be installed on metal ones.

Screw one of these metal anchors to the top of a weak fence post and drive another into the ground below it, using a sledgehammer or other heavy tool. This will help to strengthen the connection between the broken post and its concrete anchor. If the damage to the post is serious, you’ll need to replace it entirely.

Falling Panels

If you find a panel that has fallen off your fence, it’s important to check the rest of the structure. If the rest of the panels are intact, the easiest fix is to re-glue the panel to its frame using Titebond III wood glue. If the frames are exposed, stain the area to match the surrounding wood tone. You can also paint larger areas with acrylics, thinned down with water. You can then blend colors to match the tone and make the repair nearly invisible.

The failure of the panel could have been caused by a number of issues. It appears that the slotted holes for fixings were too close to the edge of the panel, and the sheeting was quite thin. This may have caused material overload if the panel had been subjected to dynamic effects.

Choosing a Roofing Contractor

The design process is complex, and a number of factors must be considered. Designers should consider working with a professional roofing contractor or roof consultant. For professional help, call Roofing Columbus GA now!

Roofing

Applied vapor barrier (AVB) and polyisocyanurate are common insulations for built-up roofs. Felt plies are sometimes used in AVB. A layered construction is common for polyiso BURs.

The roof is one of the most important parts of a building because it protects against rain, snow, sunlight, and extremes of temperature. Choosing the right roofing materials can have a huge impact on how well a roof performs and lasts. There are many different roofing materials to choose from, and each has its own advantages and disadvantages. The most popular roofing material is asphalt shingles, which are cost-effective and durable. However, there are also other materials that offer a more unique look. Clay shingles have a beautiful Mediterranean style and are eco-friendly. They are fireproof and non-fading, and they can last up to 50 years. Metal is another option, and it offers superior durability in harsh weather conditions.

The choice of roofing material can have a big impact on the price and quality of a building, as well as its visual appeal. Traditional roofing materials include wood shingles, clay tiles, slate, and metal panels. In recent years, new roofing materials and systems have been developed to provide a greener alternative to traditional materials. For example, solar-powered roofing can reduce energy bills by providing an alternative source of electricity.

Other types of roofing materials include corrugated galvanized iron, copper, aluminum, and terne plate steel (which is stainless and has a tin coating). These are suitable for flat roofs or roofs with a pitch of 3:12 or greater. Some metal roofing is soldered or welded and can be fixed to timber joists or concrete slabs.

Alternatively, PVC membrane is an effective roof covering. It is highly durable and resistant to bacterial growth, industrial chemical atmospheres, root penetration, and extreme weather conditions. It is available in large sheets that minimize the number of seams, which are prone to leaks. It is often heat-welded and can be fixed to either nailable or nonnailable decks. It can be fully adhered or loosely laid and usually lasts 15–30 years.

Other low-slope roof coverings include thatch, which can be made from a variety of plants, including wheat, rye straw, or water reed. It is fire-resistant and can be curved to accommodate a building’s structure.

Installation

Whether you’re installing a new roof or replacing old shingles, a professional is your best choice. Choose a contractor who is credentialed by the product manufacturer and has good local references. Your homeowners’ insurance company may also have a list of recommended contractors.

XPS insulation is an environmentally friendly roofing material that’s sometimes used when re-roofing. It is more durable than polyisocyanurate insulation and does not absorb water like cellulose or fiberglass.

Installing a roof requires a lot of labor. Make sure to hire a crew that will work safely and efficiently.

Often, the most vulnerable areas are chimneys and valleys (where roofing planes meet). Sealing these areas with underlayment or felt paper is critical to preventing leaks. Replacing or repairing flashing, which covers the seams of chimneys and where roof planes meet, can also prevent leaks.

Maintenance

It’s important to keep an eye on your roof throughout the year to ensure that the shingles do not show signs of excessive wear or tear. During this time, you should also inspect the caulking around chimneys and vent pipes to prevent water leaks in these areas.

Another thing to look for is the growth of moss or lichen. These organisms can cause the material beneath shingles to decay, resulting in leaking or mold. Also, if tree branches hang over your house, it is a good idea to trim them on an annual basis to protect the structure and prevent damage during storms.

All maintenance crews are briefed on the needs and systems of the buildings they are servicing on that day’s schedule prior to arriving at your facility. This includes cleaning drains and gutters, pruning all trees and organic growth away from the roof, and re-flashing openings in penetration base flashing.

Repairs

Like painting a room or installing new cabinets, roofing is one of the larger home improvement projects you can undertake. And like those other projects, it’s important to start off right with proper preparation. That means getting into the attic or crawlspace and taking high-res pictures of every inch of that roof. Look for damp stains, any signs of standing water (which can be the first sign of major leaks), any paint that’s peeling, or any other obvious damage. Then check out the shingles, flashing, and valleys for any that are missing, thinning, or damaged.

If you do find damage, it’s time to call in the professionals. And don’t be afraid to have them take off all the shingles to see exactly what kind of condition your roof is in. If you do this, be sure to have a dumpster handy and tarps for the lawn underneath and the foundation plantings or shrubbery on the side.

The last thing you want is for these elements to get wet and start rotting or molding. Roof repairs aren’t always covered by insurance, though the cause of the damage might be—for example, hail or fallen tree branches could qualify as an accident and may be covered.

Some of the most common roof repairs include shingle repair, soffit repair, and dormer or truss repair. The cost of these services will vary depending on your location and the severity of the damage. A professional can help you estimate the cost of these services before they start and help you budget accordingly.

What Is a Sewer Scope Inspection?

A sewer scope is a small camera on the end of a long cable that gets inserted into your home’s plumbing line to check for damage, signs of trouble down the road and more. A home inspector will run this test as part of a comprehensive home inspection or separately as an add-on service.

Sewer Scope Inspection

Sewer lines aren’t something you can easily see, so a home inspector must use specialized equipment to check for problems. A standard Sewer Scope Inspection takes just one hour and can be added to a home inspection, or scheduled as a separate service. Adding a sewer scope inspection to a home purchase gives a complete picture of the condition of the waste lines, making it easier for buyers to make an informed decision about their new home.

A trained professional will begin the inspection by setting up an access point, double checking the location for leaks, and putting down drop cloths as needed. Then, they’ll push a long cable with a camera attached to its end down the drain and all the way into your home’s sewage line connection to the septic tank or city sewer line. The video produced is recorded and can be reviewed afterward to look for signs of blockages, damage, or poor installation.

Some common symptoms of a faulty sewage line include a foul odor, damp and soggy lawns above the sewage line, and backflow in your home. While these signs aren’t definitive, they can be a good indication that the lateral sewer line is damaged. Once the inspector has a clear picture of your sewage lines, they can recommend next steps and suggest contractors that may be able to help.

In many cases, the simplest solution is to replace the damaged line. However, this can be very expensive and must be done in a timely manner to avoid further damage or contamination. A faulty sewer line can also cause other costly problems, such as water or sewage backing up into your house, so regular scope inspections are essential for home maintenance.

Even if your home’s pipes are in excellent shape, it’s always a good idea to add a sewer scope inspection to any home sale. Shifting ground, tree roots, and other environmental factors can cause damage to sewer lines over time, so it’s best to catch a problem before it becomes worse. If you’re selling your home, getting a scope inspection can give you peace of mind and help you get top dollar for your property.

Equipment

Sewer line problems can be expensive, especially if they’re left unchecked. That’s why sewer scope inspections are an important part of the home buying process. If you’re in the business of home inspections, adding this ancillary service to your offerings can help you generate more revenue and keep your clients happy.

A home inspector uses a special camera to view and record the inside of a sewer pipe. This enables them to spot issues that wouldn’t be visible to the naked eye. Then they can recommend repairs to the homeowner or seller and help them avoid costly future problems.

The equipment used for a sewer scope inspection is relatively inexpensive and easy to transport. It consists of a small video camera with a long cable and a portable control unit. The inspector inserts the camera into the sewage line, also known as a lateral, through the cleanout at the house. Then the camera travels down the lateral until it reaches the main sewer line, typically located under the street. The camera can detect issues like broken pipes, offset joints, root intrusions and clogs. The inspector then notes the locations of these problems for future reference.

Having the right equipment is crucial for success in the sewer scope inspection business. The inspector needs to have a good-quality camera that’s durable and can be maneuvered easily through the pipes. They also need a portable control unit that’s reliable and can handle the rigors of daily use. The units also need to be easy to carry and set up.

Another key to success is having the right training and experience to operate the equipment safely and accurately. Home inspectors who have been trained in the use of sewer scopes can spot potential problems that aren’t readily apparent to the untrained eye. This allows them to make recommendations to the home seller that can potentially save them thousands of dollars in repair costs.

It’s a good idea for all home buyers to get a sewer scope inspection before making an offer on a property. This is because the expense of repairing or replacing a damaged sewer line can run into the tens of thousands of dollars. In addition, older homes may have pipes made of clay or tar paper that are prone to cracking and breaking.

Training

During a sewer scope inspection, a home inspector inserts a plumbing camera attached to a snake-like cable into a house’s drainpipe and streams live video on a monitor. This allows the inspector to look for blockages, damage to the pipes and other serious problems that can’t be seen with the naked eye.

A damaged sewer line can cause serious health and structural damage to a home. This is why it’s essential for homeowners, buyers and sellers to have routine inspections done to spot issues before they become costly repairs or emergencies.

Once you’ve completed the course, you’ll be ready to begin offering this valuable ancillary service to your clients. To start, you’ll need to invest in a quality camera system. They aren’t cheap, but you can write off the cost as a business expense. The next step is to decide if you’ll offer this service as part of your home inspection package or as an add-on.

After establishing an access point and checking for leaks, your inspector will place dropcloths before pushing the camera scope into the drainpipe. The inspector will then carefully observe the results on a large monitor. This is where they’ll be able to spot any potential problems, such as tree roots blocking the pipe or misaligned joints.

Other common problems spotted during a sewer scope inspection include sagging pipes due to ground shifting and the deterioration of older clay pipes. These pipes often have to be replaced with PVC, which is more durable and less prone to cracking and leaks.

Once the inspection is complete, your inspector will provide a written report that outlines the findings and offers suggestions for next steps. A reputable home inspector will be able to explain the problem and recommend a solution in an easy-to-understand way. This will allow homeowners, buyers and sellers to act quickly to prevent costly repairs or disasters.

Insurance

Depending on how you structure your business, there are several options for sewer scope insurance coverage. One option is for home inspectors to purchase a commercial general liability policy that includes coverage for their work. Another option is for home inspectors to purchase specialized professional liability coverage for their sewer scope inspection work.

As a home buyer, you should always have a sewer scope inspection done before purchasing a new home. This is important to identify any potential problems that may not show up on a standard home inspection, including severe damage or serious blockages. You also want to have a clear idea of the condition of your sewage system so you can request the appropriate repairs before they become an expensive and dangerous issue.

A sewer scope inspection uses a snake-like cable to examine your home’s sewage line. These privately-owned pipes lead from your home to the city sewer main or septic tank, and can reveal problems like cracks, root infiltration, or clogs. Your home inspector will provide a thorough report after the inspection that can be used to request necessary repairs before they become an emergency.

If you’re a home inspector, a sewer scope inspection can help protect your business by reducing the risk of expensive lawsuits from unsatisfied customers. By offering this service to your clients, you’ll be able to attract more business and increase your income. You can even offer a discount on your services to homebuyers who request this additional inspection.

Many factors can contribute to the need for a sewer scope inspection, including ground shifting, soil conditions, and construction errors. By scheduling regular inspections, you can identify these issues and repair them before they cause costly damage to your property or injury to a homeowner.

A faulty sewer line can cause numerous health and safety issues, from smelly and contaminated basements to structural damage and water leaks in the crawl space. In addition, a damaged sewer line can result in costly repairs and replacements, as well as damage to your landscaping, driveway, sidewalk, or patio. A reputable home inspector will recommend getting a sewer scope inspection before you buy a new home to avoid these problems.

Top Janitorial Companies

When searching for a janitorial company, look for companies that have industry knowledge and experience. A company that understands your business, industry, and facility will be better able to tailor a service to your specific needs. There are industry-wide cleaning rules that apply to all facilities, but your unique situation may require a more customized solution. The best janitorial companies have a keen eye for detail, experience in scheduling and strategizing, and strong communication skills. They should be able to respond quickly to your questions, concerns, and problems.

Janitorial Companies

Janitorial Companies offer a variety of janitorial services to commercial and residential properties. These services include floor care, specialized cleaning, and emergency response services. With over 1,000 properties in the region, they can help keep your property clean and sanitary.

In a business plan, it is crucial to identify your target customers and the type of janitorial services you provide. Consider which customers you are targeting and how you can outperform your competitors. For example, if your target customers are homeowners, they may respond differently to marketing campaigns and promotions than warehouse managers. Therefore, it is vital to break down your customer base by demographics and psychographic profiles. Make sure to discuss customer location, income levels, and other factors. In addition, be sure to include any specialties you plan to offer.

A business plan should also include a detailed financial plan. If you are unsure of the financial implications of starting a janitorial service, a financial advisor can help you plan your finances. A professional janitorial service business plan is essential for a successful business.

A website is an important marketing tool for a janitorial company. It can showcase unique cleaning techniques and services and show off positive customer reviews. It can also promote professional memberships and community commitments. By advertising locally, a janitorial company can maximize its marketing budget. Approximately 97% of search engine users look for local businesses.

Security concerns are another issue to consider when hiring a janitorial service. Because cleaning companies often have high employee turnover, they are susceptible to security breaches. It is not cost-effective for a janitorial service to hire new employees. This additional cost can be passed on to the customer. Eventually, this leads to security risk and a higher cost.

It is one of the largest franchised janitorial companies in the States. The company was founded by Arleen Cavanaugh in 1996 and has expanded to over 180 locations across the country. Its franchisees offer dependable commercial janitorial services and a variety of financing and clerical assistance services. Plus, the company has an extensive training program and expansion opportunities.

And if you have any problems with your service, their janitorial teams are ready to respond within two hours. The company is headquartered and has franchises. It focuses on janitorial services in commercial buildings but also offers franchise opportunities.

It employs 35 people. This company has a diverse workforce, with 54% women and 46% men. Most employees are highly trained and highly experienced, and they are dedicated to the satisfaction of their customers. The company has been in business for ten years. It has won many awards for excellent service and has a long-standing reputation.

The commercial cleaning franchise is seeking qualified entrepreneurs to grow its brand footprint in new markets. The company has 37 support centers. In addition, it has franchised business owners.

The company began in 1985 and is a leading franchised brand in the commercial cleaning industry. Its franchise system allows thousands of entrepreneurs to run their own independently owned commercial cleaning businesses. In 2015, Coverall celebrated its thirty-year anniversary and celebrated the opening of new franchised businesses.